
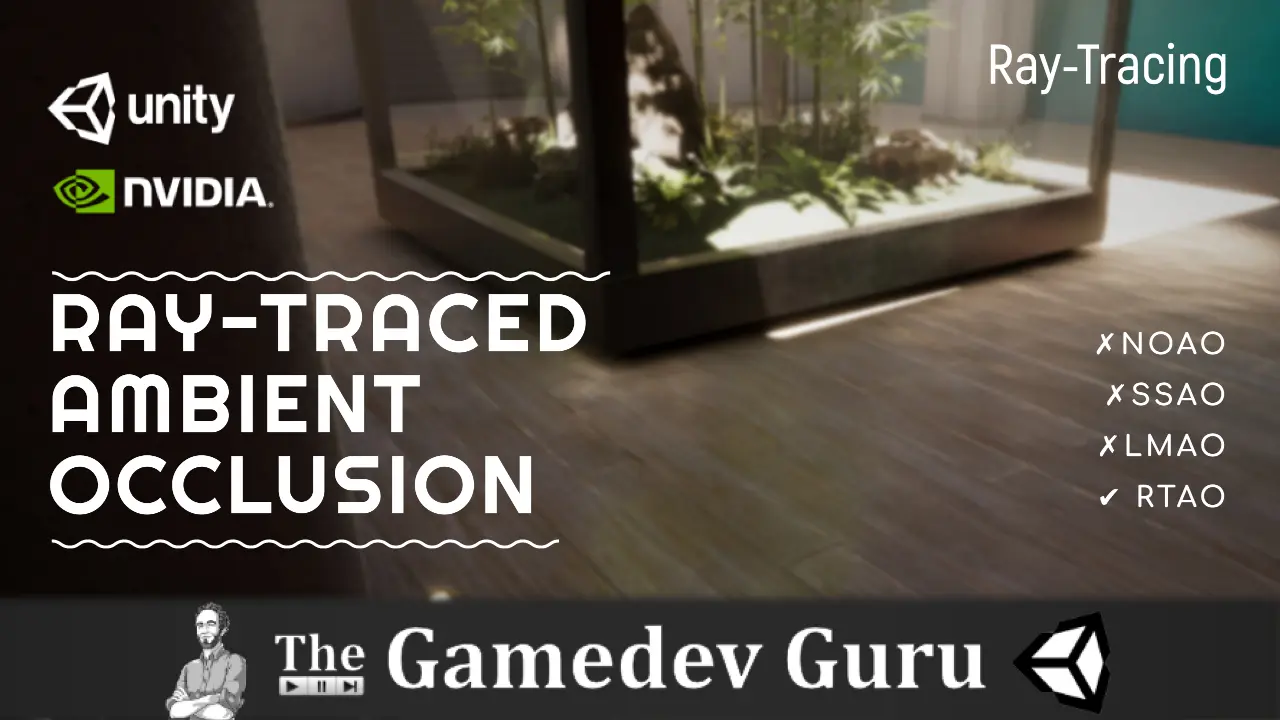
In this post, you will learn the magic behind Unity Ray-Traced Ambient Occlusion (RTAO).
Today, you will see:
- What ambient occlusion will do for you
- The visual superiority of Ray-Traced Ambient Occlusion (RTAO) over Screen-Space Ambient Occlusion (SSAO)
Let’s get your game to look the way you always intended.
Basics First: What Is Ambient Occlusion?
Let’s first bring the topic of ambient occlusion to the real world. It’ll help you understand why you need this effect in your Unity game.
The next time you go out during daylight, pay attention to the world around you.
The reason you can see surfaces is because of the light coming from the sun. Sunlight hits the surfaces and part of that light is reflected into your eye.
That’s what we call direct lighting and we have been doing that in graphics pretty well for decades.
However, light can also bounce to other surfaces, not just to your eyes. And some of these future bounces will end up reaching your eyes, increasing the perceived brightness of that spot in the surface.
That’s what we call indirect lighting. And in graphics we have a bigger problem with indirect lighting because it’s very expensive to calculate in real-time.
Here’s an example of indirect lighting. The purple lights are not directly hitting the chairs, but the rays indirectly reach them. That makes them look purple.
Now, talking about light bounces…
Light doesn’t reach all surfaces equally.
Think of a long but narrow pipe. If you look through it, you will see how its inner surface darkens as you look deeper into it.
You will see the same darkening effect in isolated corners and in the gaps between objects, e.g. bricks.
Why?
Because fewer light rays hit those areas. They are more occluded, i.e. they have a smaller exposed surface. They have a lower chance of receiving bounced light.
That’s why secluded areas look darker in real life.

Like I said, in graphics we are quite capable of doing direct lighting. And very often we simulate indirect lighting by brightening up the whole scene through ambient lighting. Simply put, that’s often a constant color we add to every pixel.
The problem?
Now these secluded areas don’t look as dark as they should. We added a constant color in our scene, not taking into account the occlusion of the surfaces.
And this is why we had to come up with a technique called *Ambient Occlusion (AO).
AO is a rendering technique that simply darkens less-exposed spots. AO adds “fake shadows” to these “secluded” areas because the traditional graphics rendering methods hardly take real indirect lighting into account.
With AO, hard to reach areas become darker. And your eyes will appreciate it, as otherwise it’ll look quite artificial.
But let’s cut the chat for a bit. We want pictures.
How does ambient occlusion look like?
How Does Screen-Space Ambient Occlusion (SSAO) Look Like in Unity?
(Ok, just a few short paragraphs first. They’re important)
The traditional method of rendering ambient occlusion is to use a post-processing effect.
We call it Screen-Space Ambient Occlusion. It is screen-space because we use information coming from the current frame/screen to add these fake shadows on top of the surfaces.
In Unity, you add SSAO by using post-processing volumes. You can do this in URP, HDRP and the built-in render pipeline. It’s quite easy, really.
I’d love to go on, but I promised to cut the chat for a bit.
Let’s see the visual impact of Ambient Occlusion.
You see the areas around edges and inner surfaces becoming darker?
Without AO, there’ll be something off about all your graphics. And SSAO is not perfect, as we will discuss later. But it helps add some realism.
Ok, now that you see what AO does… Let’s talk about something important.
While SSAO is the typical method for rendering AO, there are other ways.
For example, we can use Unity Lightmapper to bake the ambient occlusion into your (static) scene during editor time. This kinda means that Unity generates a darker texture that we paint on top of your original textures (simplified explanation).
Baked AO looks well, although baking it takes time, tweaking effort and it has a memory performance hit on your target device.
And now we come to the main point of this post…
There’s new method of rendering Ambient Occlusion in real-time with more accuracy.
Any guess?
Real-time Ray-Traced Ambient Occlusion (RTAO).
Let’s get to it.
How Better Is Unity Ray-Traced Ambient Occlusion (RTAO)?
If you can recall it, SSAO only works with data in your current frame (your frame buffer). This incomplete information leads to inaccuracies, just like with most screen-space post-processing effects like reflections. After all, we are missing information about the rest of the scene.
The big advantage of Ray-Traced AO over Screen-Space AO is that it works with information of the entire scene (off-screen data).
But what about baked AO? After all, I said Unity Lightmapper does a great job at rendering AO.
Well, the main issue is that baked AO only works with static objects. I mean, it’s pre-baked. And it takes baking (and human) time to get it right.
That’s why you should consider real-time ray-traced AO for your project.
RTAO brings the best of both worlds:
- RTAO looks much better than SSAO (as it works with complete information).
- Unlike baked AO, RTAO works both with dynamic and static objects.
The downside of RTAO? Well, you’ll pay a performance hit. But more on this later.
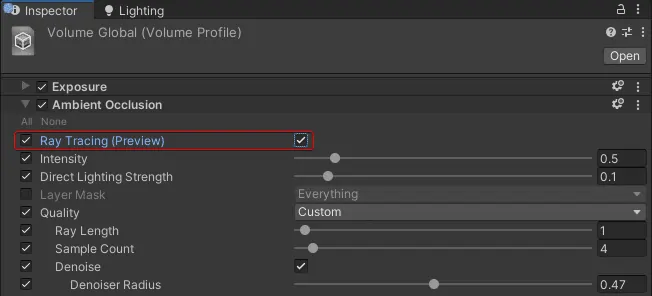
By the way, it’s easy to switch between SSAO and RTAO in Unity. Enabled ray-tracing in your project and tick the ray-traced checkbox in the ambient occlusion effect like this:
In fact, I’m going to enable ray-traced AO so you can see the differences between SSAO and RTAO for yourself.
Use the RTX button below to see the comparison.
The (many) inaccuracies of SSAO are now gone. And the missing soft shadows we would expect in real life are now there.
That’s the advantage of working with off-screen data in real-time 🙂
Let’s not stop here. This is how RTAO looks with the default parameters.
However…
You know there’s more juice to this. After all, we are game developers.
We need parameters to play with.
We want to get our visuals to match our art style.
So let’s see the RTAO parameters you can tweak.

The Ray-Traced AO Parameters You Can Play With
As soon as you enable ray-tracing in your AO effect, you’ll instantly get to play with these new parameter sliders.
Eager?
Here are they:
- Intensity
- Direct Lighting Strength
- Ray Length
- Sample Count
- Denoising
Even better, let’s see what they are and what they do.
RTAO Intensity
Intensity is self explanatory.
Between 0 and 4, this value dictates how strong the ambient occlusion (darkening) effect is.
Use the slider to see the effect of Unity Ambient Occlusion Intensity.

RTAO Direct Lighting Strength
The direct lighting strength controls how much the occlusion affects direct diffuse lighting.
Think of the gap between bricks.
These gaps are slightly occluded areas, receiving less light than usual.
But if I pointed a light towards the bricks (direct lighting), should we still darken that spot?
That’s what this value answers.
A value of 1 will still darken your surface even under direct lighting. That might play against realism, so I suggest having a low value here, e.g. 0.1.
Use the slider to see the visual difference the direct lighting strength does between 0 and 1.

RTAO Ray Length
Every ray Unity casts has a length before it “dies”.
The longer your rays are, the higher the chances it will hit a nearby surface and decide that pixel is “more occluded than before”.
Shorter rays will lead to smaller scale and local ambient occlusion.
If you increase the length of your rays, you go from local ambient occlusion to sky visibility.
The default value of 0.5 looks well. But having access to this parameter will help you achieve your target art style.
Use the slider to compare the effect on ray length.
RTAO Sample Count
The ray-tracing sample count is the number of rays you shoot per pixel, per frame.
Higher sample count give you higher accuracy and better results.
However, I could barely notice any visual difference going above 2 rays. And you shouldn’t go higher than 1 due to performance reasons (more on that later).
Higher sample counts are only suited for visually demanding applications like architecture and automotive.
No screenshot for this one 🙂

RTAO Denoise
When you use ray-tracing, it’s easy to see it generating visual noise on your surfaces. After all, we can only cast so many rays before quickly killing our performance.
That’s why we often add a denoising filter after Unity calculates Ray-Traced AO. This will soften these annoying visual artifacts.
It’s almost mandatory to use it.

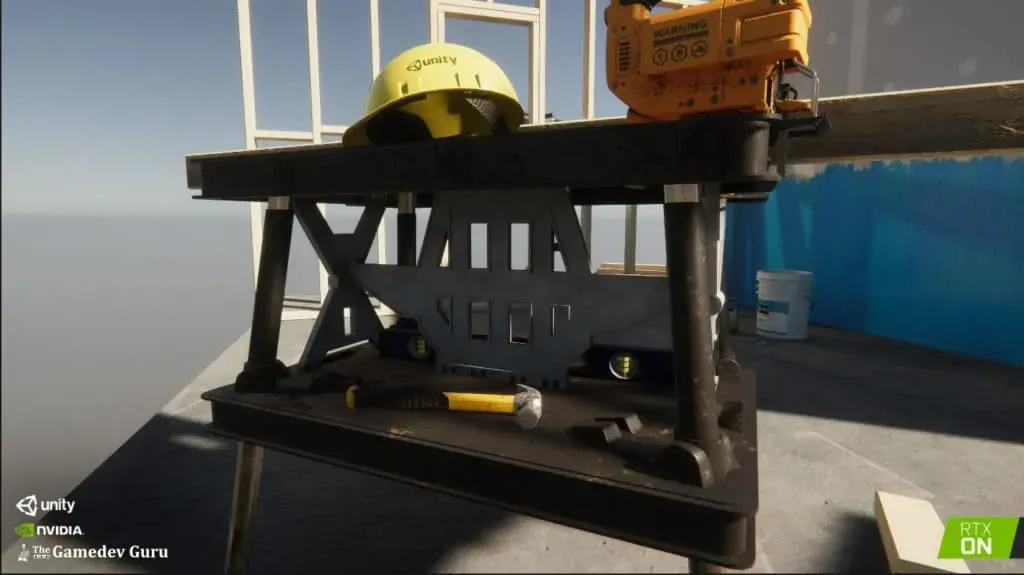
RTAO Denoise Radius
On top of activating the denoise filter, you need to specify the denoising radius.
In general, the higher the radius, the smoother your ray-traced ambient occlusion will look.
(Look at the helmet)
The Performance Cost of Ray-Traced Ambient Occlusion in Unity
I won’t lie: ray-tracing is expensive.
But remember, we now have mainstream ray-tracing hardware acceleration thanks to NVIDIA.
Real-time ray-tracing is now affordable. Especially with low (performance) impact effects like Ambient Occlusion.
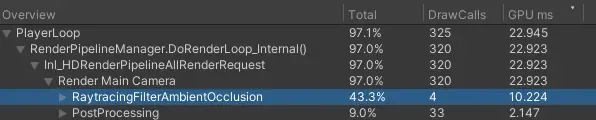
As usual, I made several measurements using the built-in Unity GPU profiler. I took average GPU time samples on different configurations to see what parameters contributed the most to the performance cost of RTAO.
As a reference, this is the hardware I’m running these tests on:
- CPU: Ryzen 2700X
- GPU: Titan RTX
And here are my conclusions based on Unity 2020.2.0b6 and HRDP 10.0.0-preview.27.
Major RTAO performance offenders
- Render resolution
- Sample count
- Layer mask (to ignore specific scene objects)
Minor RTAO performance offenders
- Ray length. Longer rays increase the depth of tree traversal on ray-tracing (and the raymarching step on the rasterization technique).
- Denoising adds 1ms to the frame times on my tests. So its cost seems to be relatively fixed. The radius didn’t seem to affect performance.
- Bigger denoising radius increases its performance cost.
And here are some GPU times on the original HDRP project template (the one with the helmet):
- On 1440p resolution:
- Baseline: 6.5ms
- 4 Samples: 7.5ms
- 64 samples: 37ms
- Increasing ray length from 0.5 to 50 increased the frame time from 16 to 18,5ms (20 samples).
- On 4K resolution:
- Baseline 7.5ms
- 4 samples 14ms
- 64 samples 87ms
Most likely, ray-traced AO is something you can afford in your game.
Just keep the sample count low, adjust the layer mask and be frugal with the ray length. Oh, and don’t push your players to go all-in on screen resolution.
Don’t forget: adjust your target layer mask to ignore the unimportant elements of your scene. You’ll pay less for your Ray-Traced AO in Unity.
And just brainstorming here, but talking about layer mask: you may be able to improve performance by trying a hybrid approach. Use baked AO for the static elements and RTAO only for the dynamic elements by setting the correct layer mask.
Get the Unity Performance Checklist
Sign up to access the checklist and companion resources in your members area.
Already a member? Open this resource.
What’s Next?
If you missed my visual introduction to ray-tracing in Unity, check it out now. That post will give you a good insight on what to expect from it.
And remember: while real-time ray-tracing is now cheaper than ever, you will still have to make room in your performance budget for it.
Get started in your ray-tracing journey by freeing up hardware resources with my Unity Performance Checklist.
Talk to you next week.
~ Ruben (The Gamedev Guru)